
Candid photography records a moment without directing the people in it to perform for the camera. Someone can know you are photographing an event and still behave naturally. Your job is to anticipate the interaction, choose a useful position and keep the camera ready without taking over the scene.
For a first attempt, work with people who are comfortable being photographed. Watch one interaction for a few minutes, choose a clean background, and photograph the action and the response. A small set that explains what happened is more useful than hundreds of unrelated expressions.
Understand the Moment Before You Photograph It
Look for a relationship between people, an action with an outcome, or a small detail that tells the viewer where they are. A person looking away from the lens is not automatically a compelling candid. Ask what the photograph will communicate without your explanation.
At a gathering, useful cues include someone arriving, a story reaching its punchline, a gift being opened or a speaker turning toward a listener. The interesting picture may be the listener’s response after the main action, so resist checking the camera screen immediately after every frame.
Separate Candid Moments From Directed Portraits
If you ask a couple to walk toward you, the activity is directed even if their laughter becomes spontaneous. That can make a good lifestyle portrait; describe it honestly. If you ask someone to repeat an action for the camera, do not present the resulting frame as an untouched record of the original moment.
You can plan your position, exposure and timing while leaving the interaction alone. The distinction is what you ask the subjects to do, not whether you prepared carefully.
Make People Comfortable and Respect Boundaries
At a client event, introduce yourself, learn which people or moments should not be photographed, and agree where photographs may be shared. A request for candid coverage is not permission to ignore a guest who asks you to stop. Photographing and publishing are separate decisions.
In a private home or small gathering, ask before starting. Give people an easy way to decline. Be especially careful with children, distress, medical situations and intimate moments: prioritize the person over the frame. Avoid making someone’s embarrassment the point of the picture.
A quiet camera or a longer lens does not remove these responsibilities. This is practical conduct guidance, not a statement that photography or publication is lawful in every location; follow the venue’s rules and applicable requirements.
Anticipation, Position and Camera Settings
Choose a Position Before the Reaction
Start by looking at the light and background rather than following faces with the camera. Position yourself where the likely subject has readable light and enough separation from distractions. Leave room for hands, the object being used and another person’s reaction when those details explain the moment.
- Conversation: stand at an angle where you can see both the speaker and at least one listener. Wait for a gesture or change in expression instead of photographing only open mouths.
- Arrival or greeting: choose a position beside the expected path, keeping space around the people who may embrace. Do not block the doorway.
- Activity at a table: frame the person and the task together. Move a little to avoid a bottle or chair cutting through the face; do not rearrange the activity just to make it look spontaneous.
- Speech or performance: cover the main subject, then look toward the audience for a response. Move during a natural pause rather than crossing the view at the key moment.
Use the lens you have before buying equipment. A wider view can include context when you have comfortable access; a longer focal length can isolate a reaction from farther away. Neither guarantees a better moment. Keep a respectful working distance and avoid pushing into an interaction simply to fill the frame.
Set the Camera for the Movement You Expect
These are available-light starting points, not tested recipes for every camera or scene. Subject speed, focal length, light and your lens change what works. Take a trial frame before the important moment and inspect focus, motion and highlights.
- People talking or making small gestures: try 1/250 second, an aperture around f/2.8–f/4 if the lens allows it, and Auto ISO. Use a narrower aperture if several faces at different distances must be sharp.
- Walking, greetings or active children: start around 1/500 second and increase it if movement still blurs. Continuous autofocus can help while the subject’s distance changes.
- Fast dancing or a toss: try 1/1000 second when the available light permits. Watch the actual result; a fast shutter cannot correct missed focus.
- Low light: preserve enough shutter speed for the subject, open the aperture as appropriate and allow ISO to rise. Stabilization helps with camera movement, but it does not stop people moving.
Manual mode with Auto ISO lets you hold shutter and aperture while the camera adjusts ISO. Shutter priority is another useful option when motion is the main concern. Watch the exposure limits and check your camera’s Auto ISO behavior. The camera-settings guide explains those controls in more detail.
Choose a focus area that reliably finds your subject. Face or eye detection can help, but check which person it selects in a group. Use short bursts around a developing action, then release the shutter and watch again. Holding the shutter continuously can leave you sorting near-duplicates without improving your timing.
Check Quiet-Shutter Tradeoffs
Disable unnecessary beeps when appropriate. Electronic or silent shutter can reduce disruption, but some cameras show banding under artificial light or distort moving subjects. Nikon documents these limitations for the Z 7 and Z 6 silent-photography mode. Check your own model and lighting; do not assume that “silent” is always the best setting.
If flash is permitted and needed, set it up before the moment and understand its sync and recycle limits. Avoid repeatedly flashing someone at close range after they have shown discomfort. Available-light shutter suggestions above are not a flash setup.
Study a Real Candid Example
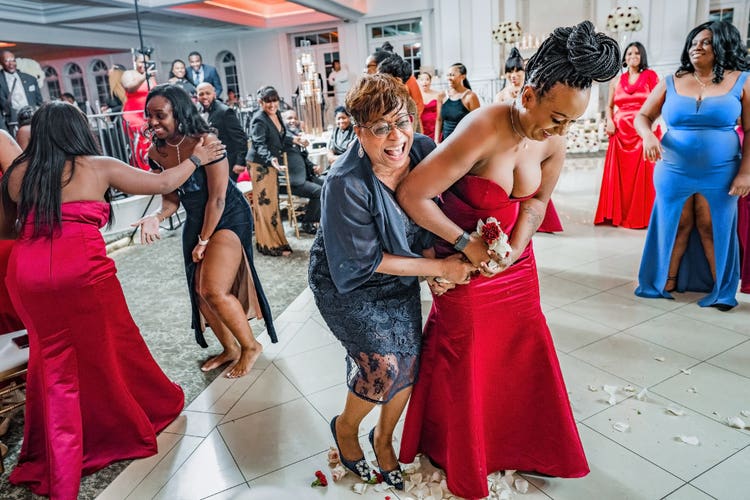
Notice the central hands and bouquet, the visible expressions and the surrounding guests. Keeping more than one reaction in the frame gives the event context. This is a visual reading of Lambert’s published photograph, not a reconstruction of her camera position, settings or frame sequence. Her article emphasizes observation, anticipation and preparation; no exposure settings are supplied for this picture.
Build a Short Sequence, Then Edit It
Instead of selecting only isolated close-ups, look for three complementary views: a scene-setting frame, the central action and a response or detail. They do not need to come from the same burst. Keep their order truthful if the sequence is presented as a record of what happened.
For example, at a family meal you might photograph the table and people together, someone serving a dish, then the recipient’s reaction. This is a suggested practice sequence, not a report from a session we photographed. You cannot guarantee the reaction; if nothing develops, wait or choose another interaction.
When selecting images, compare expression, hand position, focus and background. Keep the frame that communicates the moment rather than every technically acceptable variation. There is no universal number of images that makes a portfolio strong.
Correct exposure and white balance consistently. Crop distracting edges when the result still represents the scene fairly. If you move people, replace expressions or combine moments, treat the result as a creative alteration rather than an unaltered documentary frame. A candid-looking image and a documentary claim are not the same thing.
For client delivery, group finished images into a clear sequence or event collection and keep your working archive backed up. A client gallery can present the finished set; it does not decide which pictures you have permission to publish.
Common Candid Photography Mistakes
- Chasing every expression: choose a position with a useful background and allow an interaction to develop.
- Looking only at the main subject: check the listener or nearby guest after the action.
- Using the widest aperture for every group: give the important faces enough depth of field.
- Confusing blur with bad timing: inspect shutter speed and focus before deciding you missed the moment creatively.
- Calling a prompted action unposed: keep your description consistent with how the image was made.
- Ignoring discomfort: lower the camera and respect the request, even if you expected a good photograph.
- Over-editing the event: preserve meaningful context and distinguish creative composites from documentary images.
- Skipping backup and communication: protect the files and confirm delivery and sharing expectations before the job ends.
A Simple Practice Assignment
With a willing adult friend or family member, spend 15 minutes photographing an ordinary activity such as preparing tea or tending a plant. Explain the exercise first, then let the activity unfold without repeated posing instructions.
- Choose one place with usable light and a clean view of the activity.
- Set exposure and autofocus before the action; make a test frame.
- Capture a wider scene, an action and a response or detail without requesting a repeat.
- Select three frames and write one sentence explaining what each contributes.
- Review the set with the participant and agree before sharing it publicly.
On the next attempt, improve one thing you noticed: your position, the shutter speed, the background or the time you waited before pressing the shutter. For larger assignments, the event-photography guide helps plan coverage around the schedule. For this exercise, success is a readable, respectful moment, without a claim that every frame must be dramatic.