
A client asks for an older image, but the source capture, proof and final export live in different folders. These ten photo organization tips help you define a repeatable path from import to delivery and archive.
That's why photo organization isn't admin work that sits outside the creative process. For working photographers, it's part of the job. A messy archive slows editing, weakens handoff, and makes even strong work feel less professional once it reaches the client.
The examples are proposed studio conventions, not a workflow test or an identified photographer’s personal practice. Adapt them to your camera formats, client agreement and retention needs. For software choices, see the catalog, DAM and delivery comparison.
Table of Contents
- 1. Implement a Consistent Folder Structure Before Import
- 2. Use Descriptive File Naming Conventions
- 3. Create a Master Culling Process to Identify Selects
- 4. Leverage Metadata and Keyword Tags for Easy Searching
- 5. Organize Images by Client or Event Within Galleries
- 6. Implement Version Control for Edited and RAW Files
- 7. Use Color Coding or Star Ratings to Prioritize Images
- 8. Establish a Backup and Archive System for Organized Files
- 9. Create Selection Sets or Collections for Client Review and Delivery
- 10. Regularly Audit and Maintain Organization to Prevent Entropy
- Photo Organization: 10-Tip Comparison
- Your Blueprint for an Organized Photography Business
1. Implement a Consistent Folder Structure Before Import
The best folder system is the one a photographer can repeat under deadline pressure. If the structure changes from shoot to shoot, nothing stays findable for long. That's why a simple year-and-event hierarchy still works so well.
Choose a hierarchy you can repeat: year, date and job identifier is one option. Keep one authoritative source location and document where work files, exports and backups belong. A clear folder name does not by itself create a backup.
Use the same top-level logic every time
A wedding photographer might use 2026 > 05 May > Carter-Lee Wedding > RAW, Edited, Selects. A portrait studio might use 2026 > Family Sessions > Nguyen Family > Batch 1, Batch 2. Both work. What matters is consistency across every import, every editor, and every backup drive.
Folders should also match the way jobs are retrieved later. Most photographers don't search for “untitled folder 7.” They search by year, client, and event.
- Start broad, then narrow: Use year and month at the top level, then client or event name underneath.
- Create reusable templates: Keep a blank project folder with subfolders like RAW, Edit, Export, Deliver, and Docs.
- Document copy locations: a recognizable hierarchy helps you find copies, but distinguish the working archive from independent backups. A synchronized mirror can also propagate deletion or unwanted changes.
Practical rule: If an assistant can't guess where a file belongs without asking, the structure needs simplification.
Write a short project convention so an assistant can place a file consistently. Change it deliberately rather than inventing a new hierarchy under deadline pressure.
2. Use Descriptive File Naming Conventions
Camera filenames can collide across bodies, cards or reset counters. Keep the original camera name in your record and assign a stable identifier when your workflow requires one. Do not overwrite an existing file merely because its filename matches.
A proposed export name is 20260115-Smith-Johnson-Ceremony-001.jpg. Date, job and sequence can make a file recognizable outside its catalog. For sensitive work, use a job code instead of a client’s name in recipient-facing filenames.
Build filenames for search, not for aesthetics
A good naming system doesn't need to be elegant. It needs to be sortable and readable in Finder, Explorer, Photo Mechanic, Adobe Bridge, and cloud delivery platforms.
For event work, useful patterns often include date, client, segment, and sequence. Examples:
- 20260210-Davidson-Family-Outdoor-Select-005.jpg
- 20260308-Corporate-Gala-Sponsor-Detail-003.jpg
- 20260421-HotelLaunch-Speaker-GreenRoom-012.jpg
A few constraints keep things reliable.
- Use separators consistently: Hyphens or underscores are easier to parse than spaces.
- Keep names reasonably short: Long filenames become messy when exports, versions, and uploads stack on top.
- Add location codes when needed: Multi-location weddings and commercial shoots benefit from short venue or set abbreviations.
Filenames are the fallback system. When catalogs break, previews go missing, or folders get copied to another machine, filenames still carry the job's identity.
Before bulk renaming, preserve a backup and a mapping from old names to new names. Use the catalog’s supported rename or move workflow so file references stay connected. Adobe documents Lightroom Classic’s Library rename command and moving photos through its Folders panel.
3. Create a Master Culling Process to Identify Selects
Culling separates the intended selects from technical misses and near-duplicates. It is a review stage, not a reason to delete originals immediately. The client’s agreement, delivery requirements and your retention policy determine what must be kept.
Set a selection goal for the job, not a universal annual photo cap or a promised one-hour cleanup. A proof set, an event narrative and an archive may need different images. Back up the import before reviewing and retain required source files.
Cull fast, then judge carefully
In the first pass, flag technical misses for review: blinks, missed focus, accidental frames and similar captures. In the second, compare expression, composition and storytelling. A reject flag is different from deleting a disk file; a soft or unconventional frame may still matter to the client or story.
A wedding ceremony sequence might start with hundreds of frames and end with a tight narrative. A portrait session might narrow to a smaller gallery with clear expression and posing variety. A product shoot might separate hero images from alternates.
- Pass one flags technical issues: mark likely misses, then review them before any deletion.
- Pass two compares similar frames: Keep the strongest gesture, eye contact, and composition.
- Set a delivery target: use the agreement and purpose of the job to define the intended set; do not impose a universal rejection ratio.
Use a viewer or catalog that supports your actual camera files and the review controls you need. Compare similar frames at an appropriate view size; preview speed and AI suggestions do not establish image quality.
4. Leverage Metadata and Keyword Tags for Easy Searching
Folders and filenames handle a lot, but they don't cover everything. Metadata is what rescues an archive when a photographer needs “all first dance photos with grandparents” or “every winter lifestyle image with red products” across several years.
Many otherwise solid systems break down because, while files are stored correctly, nobody embedded useful information when the images entered the library.
Tag once, search for years
Metadata should be applied close to import, not months later when memory fades. A wedding set can carry tags like bride, groom, ceremony, reception, family formals, detail shots, and venue name. A portrait set might include client surname, location, season, age group, and session type. Commercial work often benefits from tags for usage, product line, and color palette.
Excire Foto documents automatic keywording, people search and duplicate search. Those features do not establish an accuracy percentage, a time-saving range or search latency for your library. Review suggested labels and duplicate candidates manually; do not delete files or expose identities based only on automated results.
Adobe’s Lightroom Classic keyword guidance distinguishes catalog entries, saving metadata to files and keyword export options. A searchable catalog label is not automatically embedded in every export. Review names, location and other private details before delivering files.
For photographers building a searchable archive, metadata management for photographers is worth folding into the workflow early instead of treating it like cleanup work.
- Use controlled vocabulary: Pick one term and stick with it. If one job uses “reception” and another uses “party,” search gets inconsistent.
- Apply metadata in batches: Tag groups of images by scene, subject, or location instead of one file at a time.
- Include copyright and contact details: This helps when files travel outside the original system.

5. Organize Images by Client or Event Within Galleries
Internal file organization is for the studio. Gallery organization is for the client. Those are not the same thing.
Clients don't think in terms of ingest batches, camera bodies, or edit rounds. They think in moments. Getting Ready. Ceremony. Family Formals. Reception. That's how a gallery should be structured.
Build galleries around how clients think
A wedding gallery works better when it follows the day's flow. A family session feels easier to review when indoor portraits, outdoor portraits, and individual combinations are separated cleanly. Commercial galleries benefit from sections such as Hero Images, Detail Shots, Lifestyle, and Alternates.
SendPhoto uses named collections to organize a gallery. Collection names do not give different audiences separate access or passwords. Send review-ready JPEG proofs unless the agreement specifically requires camera RAW files; verify the actual supported format and recipient workflow before promising RAW preview or delivery. Video processing can replace an upload with a stored optimized MP4, so keep an independent master.
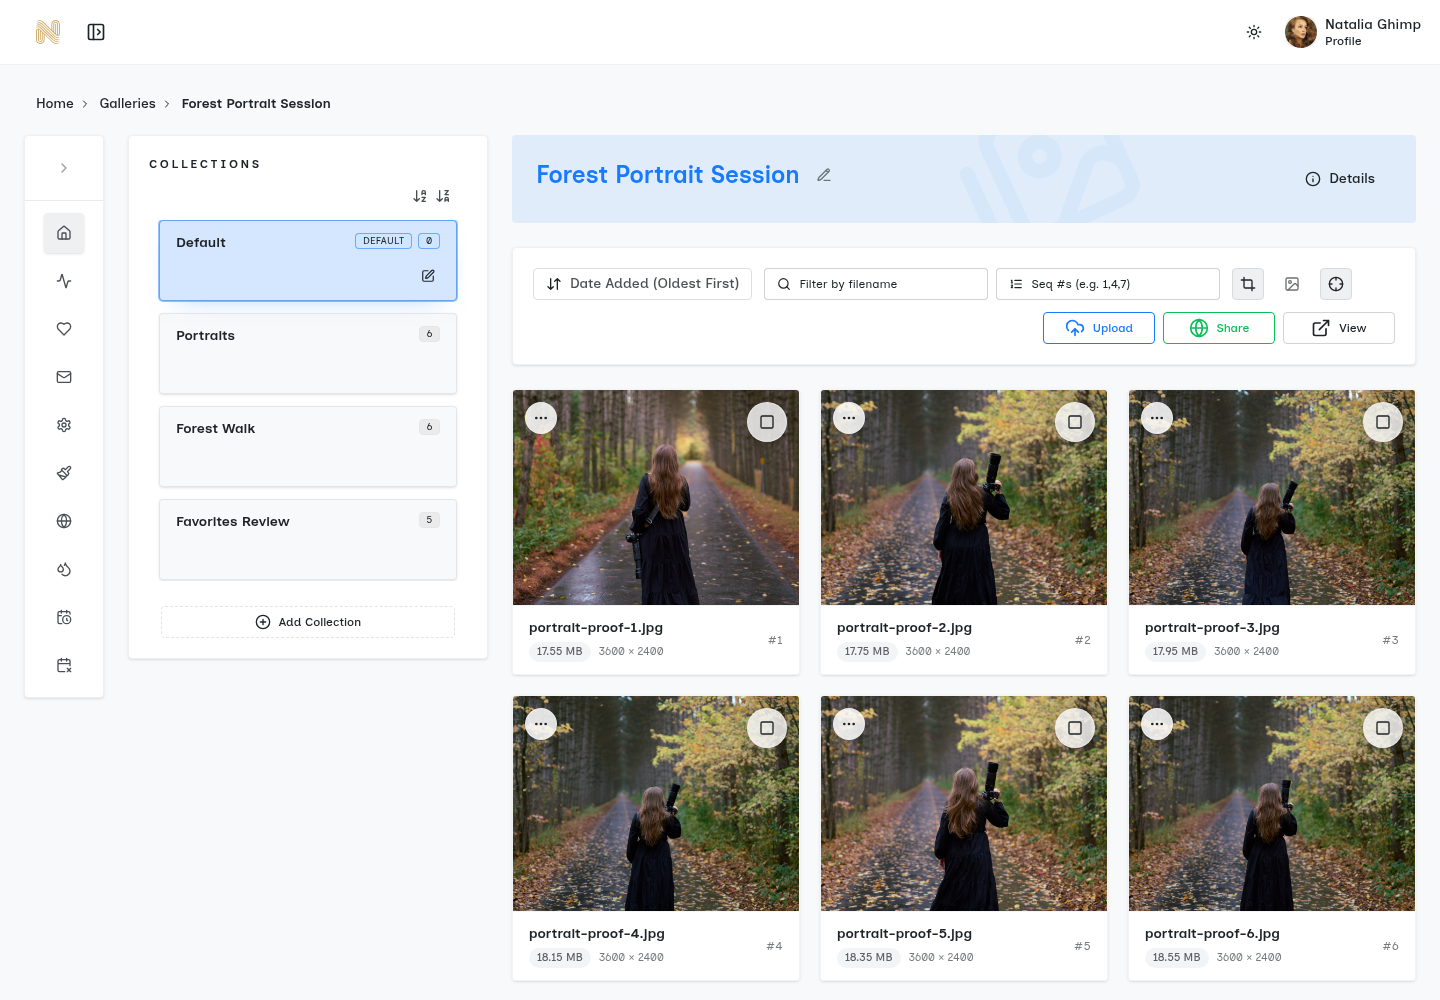
Clients review faster when the gallery answers their next click before they ask for it.
A few practical habits help:
- Name sections from the client's point of view: “Ceremony” is clearer than “Batch 3.”
- Lead with strong work: Put favorites or hero images near the start.
- Keep chronology inside each folder: Narrative flow reduces confusion.
Tell recipients which collection to start with and which action to take. Record client questions to learn whether the structure helps; do not assume a particular support reduction from the collection layout alone.
6. Implement Version Control for Edited and RAW Files
Here, version control means a naming and storage convention for source captures, work files and exports. It is not a tested history or rollback system. Recovery requires retained earlier versions, editor history where available, and independent backups.
RAW captures should remain untouched and easy to find. Working files belong in their own space. Finals should be clearly separated so the wrong version never gets uploaded, printed, or sent to a client.
Separate originals, work files, and finals
A clean project structure might look like this: Project > RAW > Originals, Project > EDIT > Working Files, Project > DELIVER > Final JPGs. A filename pattern can reinforce the same separation, such as CarterWedding-001_RAW.CR3, CarterWedding-001_EDIT_v2.psd, and CarterWedding-001_FINAL.jpg.
Separating files makes versions easier to distinguish. It cannot restore an overwritten edit unless an earlier file, usable application history or backup still exists. Preserve the source and the edit data you need; keep approved exports and their filenames in a delivery record.
Assign one owner for the current working version and explicitly record which export was approved. Before upload, check the filename, visible content and intended use. A word such as FINAL is a label, not proof of approval.
- Keep RAW and finals apart: Don't mix deliverables into capture folders.
- Use version labels consistently: v1, v2, final-web, final-print all work if the team uses them the same way.
- Restrict client downloads when needed: Send only the approved JPEGs or finals, not the full working set.
This is one of the less glamorous photo organization tips, but it saves real cleanup later.
Illustrative Project Record
The following is a proposed convention for a fictional job, not an actual client archive. Replace the names with your own job code and keep the original-to-export mapping privately.
2026/2026-07-13-JOB042/
  01-source/
  02-work/
  03-proof-exports/
  04-approved-exports/
05-records/| Record | Illustrative value | Purpose |
|---|---|---|
| Source | camera-A_IMG0042.CR3 | Original camera capture retained in the source archive |
| Work | JOB042-portrait-0042-edit-v02.psd | Named work version retained separately from the source |
| Proof | JOB042-portrait-0042-proof-v02.jpg | Client review export, not automatically approved |
| Approved export | JOB042-portrait-0042-print-v03.jpg | Filename/version recorded with the explicit approval and intended use |
The names do not prove file identity or approval. Record the actual source-to-export relationship and approval in the job notes; preserve earlier work versions only where needed by the retention policy.
7. Use Color Coding or Star Ratings to Prioritize Images
Not every good image plays the same role. Some belong on the gallery cover. Some are album candidates. Some are supporting frames that complete the story but don't need special treatment.
Color labels and star ratings turn that judgment into a visual system. The key is restraint. Too many labels create a second layer of chaos.
Keep the rating system small
A practical system might look like this. Five stars for hero images. Four stars for strong alternates. Three stars for solid delivery frames. Red for rejects, green for deliver, yellow for review. The exact setup matters less than using it the same way every time.
This becomes especially useful during edits and client review prep. A photographer can filter to five-star images for a slideshow, pull four-star frames for album design, or isolate green-labeled deliverables before export.
Document the meaning of each flag, color and star rating. These are internal review conventions in software that supports them; SendPhoto favorites do not import that rating vocabulary or establish final approval.
Working standard: keep a short shared legend and use it consistently across editors.
When the deadline permits, a later review can help you compare close alternatives with fresh attention. Keep the job’s requirements as the selection criteria.
8. Establish a Backup and Archive System for Organized Files
Organization has no value if the archive disappears. Hard drives fail, laptops get stolen, and local disasters happen without warning. That's why backup sits inside the workflow, not after it.
The HHS explanation of CISA’s 3-2-1 strategy describes one working copy plus two backups, two storage media types, and at least one off-site backup. Use this as a planning framework, not a guarantee of recovery. The same guidance calls for checking backup integrity and periodically testing restores, and considers offline backups because online copies can be disrupted.
Protect the archive before it grows
A practical setup might be primary SSD for active jobs, an external drive for local backup, and cloud storage for off-site protection. Completed projects can then move into a colder archive once delivery is complete and any immediate revision window has passed.
Plan retention and storage growth with the photography storage guide. Adobe’s catalog-backup guidance makes an important distinction: a Lightroom Classic catalog backup does not back up the photos or exported files. Include source files, needed catalog/edit data and agreed final exports in your backup plan.
- Automate the backups: Manual drag-and-drop systems fail when work gets busy.
- Test restores regularly: A backup only counts if files can be recovered.
- Keep one copy away from the studio: Off-site is what protects against theft, fire, or flood.
Set a retention policy and check what each backup job covers. Moving a project to an archive drive is not a second copy unless the required data also survives elsewhere.
9. Create Selection Sets or Collections for Client Review and Delivery
Clients usually don't need every acceptable frame. They need help choosing.
Selection sets solve that by shaping the review experience. Instead of dropping one giant gallery on the client, the photographer can create smaller collections with clear purpose. Album Essentials. Photographer Favorites. Full Gallery. That structure reduces indecision and keeps attention on the strongest work first.
Curate the decision-making process
This approach works across job types. A wedding client may receive Album Essentials, then a broader favorites set, then the complete gallery. A portrait client might see Best for Prints first, followed by the full session. A commercial client may review hero selects before moving into alternates.
SendPhoto publishes this guide. Its gallery view supports client favorites without requiring a client account, subject to the gallery’s configured access. A favorite is a preference, not an approval, order, payment or publication license. Confirm approved filenames and versions separately; the client gallery guide explains the handoff.
Optional shared passwords can be forwarded and do not establish identity. Disabled downloads do not prevent capture of viewable content. Downloads depend on global and collection settings; Original with watermarking can use a generated marked image, while ZIP downloads include permitted collections. Sharing expiry closes sharing separately from deletion and cannot recall downloaded copies.
- Create tiers with purpose: Essential, Recommended, and Full are easier to understand than vague labels.
- Use favorites to collect client input: then confirm the approved filenames, version and intended use separately from the favorite list.
- Leave room for alternates: Clients should be able to request a frame outside the top set without confusion.
10. Regularly Audit and Maintain Organization to Prevent Entropy
Even a good system drifts. One rushed import creates a stray folder. An assistant renames files differently. A drive fills up and someone dumps exports in the wrong place. Small inconsistencies pile up until retrieval slows down again.
Regular audits prevent that slide. They don't need to be dramatic. They just need to happen.
Small maintenance beats giant cleanups
A monthly check can catch incomplete backups, off-pattern naming, and misplaced exports. Quarterly review is a good time to look at archive candidates, broken folder logic, or keyword gaps. Annual review is where photographers decide what still belongs on fast storage and what should move out of the active workspace.
Include galleries in the retention review. An expired share link is separate from deletion of stored files. Before removing an export or archive copy, check the client agreement, outstanding revisions and recoverable independent copies; avoid deleting source files based solely on a duplicate finder.
- Review recent imports: Make sure new jobs follow the studio standard.
- Check archive integrity: Confirm folders, metadata, and previews still line up.
- Document changes: If the system evolves, update the workflow so the next shoot follows the new rule.
A system doesn't stay organized because it was designed well. It stays organized because someone keeps it honest.
Photo Organization: 10-Tip Comparison
Use this ten-tip comparison to decide which part needs attention. Effort labels are planning estimates, not measured implementation times or promised efficiency gains.
This comparison table puts the 10 tips into working terms: setup effort, what each step costs in time or tools, and where it fits in a full studio workflow from import to culling, editing, gallery review, delivery, and archive.
| Item | Implementation complexity | Resource requirements | Expected outcomes | Ideal use cases | Key advantages |
|---|---|---|---|---|---|
| Implement a Consistent Folder Structure Before Import | Low–Medium (initial setup + discipline) | Time to design templates; minimal software | Predictable retrieval; easier backups and archives | High-volume workflows, teams, consistent client deliveries | Predictability, faster search, simpler onboarding |
| Use Descriptive File Naming Conventions | Low–Medium (rules + batch tools) | Batch-rename tools; time for backlog renaming | Improved searchability; fewer overwrite errors | Photographers with large libraries or long-term archives | Clear IDs, automation-friendly, quick scanning |
| Create a Master Culling Process to Identify Selects | Medium (workflow design + judgment) | Culling software; time immediately after shoots | A defined review set and preserved source captures | Weddings, portrait sessions, large shoots | Prioritizes editing candidates; results depend on judgment |
| Use Metadata and Keyword Tags for Easy Searching | Medium–High (learning tools; consistent vocab) | Metadata-capable software; time to tag/backfill | Searchable labels where the software saves and indexes them | Large multi-year archives, stock/commercial photography | Consistent vocabulary and attribution; not automatic rights protection |
| Organize Images by Client or Event Within Galleries | Low–Medium (client-focused curation) | Gallery collections and curation time | Recognizable navigation and clear review instructions | Client delivery, review galleries, proofing | Groups client-facing content; not separate audience permissions |
| Implement Version Control for Edited and RAW Files | Medium–High (structure + discipline) | Increased storage; archive systems; naming/versioning | Distinguishable versions; recovery only from retained history or backups | Commercial work, clients requesting revisions long-term | Supports variants and approved-export records |
| Use Color Coding or Star Ratings to Prioritize Images | Low (simple to adopt) | Photo management software with flags/ratings | Filterable internal review stages where supported | Fast selection workflows, client consultations | Shared visual cues; favorite lists remain separate |
| Establish a Backup and Archive System for Organized Files | Medium–High (setup + maintenance) | External drives, cloud services, ongoing costs | Recoverable required files when backups and restores are verified | All professional photographers; required for irreplaceable assets | Reduces dependence on a single copy; no loss-prevention guarantee |
| Create Selection Sets or Collections for Client Review and Delivery | Low–Medium (tiered curation) | Gallery selection tools; time to build tiers | Collected preferences plus an explicit approval record | Album selection, print orders, client approvals | Defines review priorities; approval and orders remain separate |
| Regularly Audit and Maintain Organization to Prevent Entropy | Medium (recurring schedule + checks) | Time for scheduled audits; duplicate-finding tools | Sustained consistency; reduced bloat and errors | Growing studios, teams, long-running archives | Prevents decay, finds issues early, keeps system efficient |
Choose the first improvement from an actual failure: naming collisions, missing source references, unclear proof versions or incomplete backups. Assign an owner and a check that shows whether the issue is resolved.
A proposed sequence is import and back up, review and rate, apply useful metadata, preserve work versions, prepare agreed exports, deliver and record approvals, then maintain the archive. SendPhoto fits the delivery stage; keep the source catalog and backup plan independent.
Your Blueprint for an Organized Photography Business
Start with one recurring problem and make the ten steps a written routine. Preserve the source, keep filenames stable, flag selects before deleting, check metadata exports, distinguish proofs from finals, maintain independent backups and record who approved which export.
Before the next job, identify the owner of the source archive, current edit, final export and delivery record. A gallery is the client-facing part of that chain; it does not replace the archive, grant publication rights or guarantee recovery.
If collections, client favorites, optional shared passwords and download settings fit your handoff, explore SendPhoto. Choose the intended audience, permitted versions and independent retention plan before sharing.