
For an outdoor portrait portfolio, plan the background, the direction of light on the face and a fallback when the weather changes. Start with natural light; add a reflector or flash when it solves a specific problem. A repeatable process comes from checking the frame, not carrying every modifier.
This guide covers three proposed setups: sunset backlight with a reflector, an alley portrait with wall-bounced flash, and forest shade with controlled fill. Their settings are starting examples to adjust on location, not results from a shoot we performed. The linked Nikon examples show credited photographers' actual work; the SendPhoto screenshot shows gallery presentation.
Table of Contents
- Planning Your Outdoor Portfolio Shoot From the Ground Up
- Reading Natural Light and Locking In Camera Settings
- Choosing the Right Artificial Light for Outdoor Work
- Three Setups You Can Reuse on Almost Any Outdoor Shoot
- Fixing the Problems That Show Up Mid-Shoot
- From Capture to Client Gallery Without Losing the Look
- A Short Pre-Shoot Checklist You Can Actually Use
Planning Your Outdoor Portfolio Shoot From the Ground Up
Choose the location, time and intended portrait before choosing the kit. A clean head-and-shoulders frame and an environmental full-length portrait need different working space and backgrounds.
Read the space before the camera comes out
Scout at the intended shoot time where possible. Look for an open view of the sky, a clean background, accessible shade and somewhere to move if sun or wind changes. Maps can help with access and orientation, but cannot establish current shade, crowds or permissions.
Describe the first frame in one sentence: where the subject stands, where the camera goes and what lights the face.
- Main frame: identify the background and the light direction.
- Backup angle: choose a second view within easy walking distance.
- Weather alternative: agree on a sheltered location or a reschedule before the session.
Check the frame for signs, bright roads and objects intersecting the subject's head. Move the camera to remove clutter before widening the aperture for more background blur. For environmental framing, see our wide portrait lens guide.
Handle the small admin work early
Confirm access and any location-specific permit or property permission with the owner or manager. Record the meeting point, arrival time, contact details and fallback in a short call sheet. Do not infer permission from another photographer using the location.
Discuss wardrobe against the actual background: separation may matter more than matching it. Test pale clothes against a bright sky and dark clothes against dense foliage. Leave enough time to walk between spots and pack equipment away if conditions deteriorate.
Reading Natural Light and Locking In Camera Settings
Separate light direction, exposure and white balance. White balance changes how the camera renders color; it does not make a light brighter or softer. A domestic fixture's warm-white rating is not an outdoor portrait setting.
For example, the Canon EOS R6 manual lists approximately 5200 K for Daylight, 6000 K for Cloudy and 7000 K for Shade. These describe that camera's presets, not compulsory values for every outdoor scene. Use an appropriate preset or a neutral reference under the subject's light, and check skin tones. A fixed white balance can help a sequence stay consistent; reassess it when the light source changes.
With flash and ambient light together, one setting may not neutralize every source. Choose the main light for the face, consider a matching flash gel if needed, and check a test frame. A warmer light source and a higher camera white-balance setting are different controls.
Use each light condition for what it does best
- Low sun: use its direction for side light or backlight. It can still be hard light; being near sunset does not automatically soften it.
- Open shade: place the subject where they can see a broad patch of sky. Deep overhead cover can leave eye sockets dark.
- Overcast: look for direction within the softer light and a background with separation; cloud cover is not always perfectly even.
- Blue hour: keep checking shutter speed as illumination falls. Increase ISO or add light when subject movement would blur.
- Midday sun: either use its hard shadows deliberately or move into usable shade. Avoid patchy sun across the face when you want even skin tones.
Check both eyes and the shadow side of the face after moving the subject. The useful condition is the one that fits the portrait, not a universally “best” time.
Start with exposure, then refine the mood
Choose depth of field, a shutter speed suitable for movement and an ISO that gives the required exposure. Meter the face, inspect highlight clipping and magnify a test image for eye focus. A histogram describes the frame, so also inspect important local highlights such as a pale shirt or forehead.
Natural-light starting example: for a mostly still single subject in bright open shade, try manual exposure at f/4, 1/250 s and ISO 200, then adjust to the actual light. Use a faster shutter for movement, a smaller aperture for several faces at different distances, or more ISO when needed. These numbers are not measured settings for the gallery photograph below.
If the background is correctly exposed but the face is too dark, underexposing the whole frame makes that problem worse. Add reflected or flash fill, change the subject's direction, or accept a different background exposure. If highlights and the face cannot both fit the capture, choose what matters and change the setup rather than expecting RAW processing to restore clipped data. Our low-light photography guide covers the movement/noise tradeoff as light falls.
Choosing the Right Artificial Light for Outdoor Work
Add artificial light for a reason: eye light, more direction, a brighter face against the chosen background, or continuity as daylight fades. Make an ambient-only test frame first so you can identify what the added light changes.
Match the tool to the location
- Speedlight: portable fill or a nearby key; output and recycle time limit some bright-sun or large-modifier setups.
- Battery strobe: useful when more flash output is required, at the cost of a larger kit. Check the actual power and working distance.
- Continuous LED: shows the light's effect before capture, but a small unit may contribute little in strong daylight.
- Reflector: redirects existing light without batteries. It still needs usable incident light and can catch the wind.
Secure stands and modifiers, keep an assistant with equipment that needs active control, and pack away gear when it cannot be controlled safely. A reflector is not automatically a safe substitute for a wind-blown softbox.
Choose modifiers for the actual shooting conditions
Softness depends on the apparent size of the lit surface from the subject's position. A large modifier far away can still produce distinct shadows. Bring an appropriate modifier closer when feasible, then check falloff and the light on the background.
A softbox can help contain spill, while an umbrella is quick to deploy but can spill broadly. Both can act like sails. A beauty dish gives another shadow pattern; it is not inherently the right option for every portrait. Choose the simplest controllable source for the location, and use a flag only when it can be secured.
With ordinary flash, stay at or below the camera's supported sync speed for the chosen shutter mode. Faster shutter speeds require a compatible high-speed-sync setup or another supported method. Check camera, flash and trigger compatibility; do not assume every electronic shutter supports flash.
Nikon's high-speed-sync tutorial includes a real Kevin Kubota family portrait made with an SB-910 through a scrim at camera left, at 1/320 s, f/4 and ISO 250 on a D3S. It is a credited example using high-speed sync, not proof that those settings will work with ordinary flash on your camera.
Three Setups You Can Reuse on Almost Any Outdoor Shoot
Each setup below identifies the source, subject and camera positions. Make a no-fill frame, add or move the fill, then compare the face and background at the same ambient exposure. The recipes are proposed practice sequences, not three documented client sessions.
Beach backlight with fill reflector
- Position: place the sun behind or behind-and-to-one-side of the subject. Put the camera in front, with a clean horizon and safe working space.
- Fill: have an assistant hold a white reflector on the camera-facing side, angled to catch sunlight and redirect it toward the face. Watch the actual lift rather than following an arbitrary reflector angle.
- Exposure: meter the portrait and check the sky and pale clothing. Use the natural-light starting example as a meter check, then adjust. Protect important highlights; add fill if the face needs it.
- Refine: move or rotate the reflector until the eyes read clearly without squinting or a distracting hotspot. If little sunlight reaches it, move the setup or use another fill source.
Keep equipment away from surf and unstable ground. If wind prevents safe control of a reflector, remove it and choose another angle or sheltered spot. Do not expect a reflector to create light that is not there.
Urban alley with soft directional key
- Position: choose a nearby pale, matte wall to one side of the subject. Place the camera in front and check pedestrian access.
- Source: aim an off-camera flash at that wall so the illuminated wall patch becomes the apparent key light. Prevent direct flash from hitting the face if wall bounce is the intended effect.
- Exposure: make an ambient-only frame. An illustrative ordinary-flash starting point is f/4, ISO 200 and 1/125 s, provided your camera/shutter mode supports that sync speed. Adjust ambient exposure, then adjust flash output for the face.
- Refine: compare flash off/on. If the bounce is weak, move closer to a suitable wall or change the source. If it colors the skin, choose a more neutral surface rather than expecting white balance to fix every mixed light.
A red brick wall is not a neutral substitute for white stucco. In Nikon's bounce-flash examples by Chris Ogonek, a tan wall warms the subject and a white wall gives a different result. Outdoors, distant or dark surfaces may return too little light. This recipe uses bounced flash, not a diffuser placed under an overcast sky.
Shaded forest with lifted eyes
- Position: find even shade with a clear view toward brighter sky. Move away from small sun patches crossing the face.
- Source: place a small off-camera flash above eye level and to one side of the camera. A nearby modifier can soften it; the canopy does not soften the flash itself.
- Exposure: meter the ambient scene first. Try the f/4, ISO 200, 1/125 s ordinary-flash example only within your camera's sync limit, then adapt it. Add enough flash for the intended eye and face detail.
- Refine: compare with the flash off. Keep fill subordinate if you want the ambient forest look. Reposition or control spill when the flash makes the background too prominent.
Nikon's portrait tutorial by Gary Small shows a real sunlight/shadow comparison with and without fill flash at 1/250 s, f/4 and ISO 100 on a D800. It illustrates lifting facial shadows, not our proposed forest setup. Check the linked photographs and their captions before treating settings from another scene as a recipe.
Fixing the Problems That Show Up Mid-Shoot
When the result changes, identify whether the cause is position, exposure, source color or equipment stability. Make one adjustment and compare another frame before adding more gear.
Respond to the frame, not the anxiety
- Check the angle: move the camera or subject to address glasses reflections, background intersections or direct glare. Look at the result; changing the chin is not a universal fix.
- Check the background: reframe or move to a darker view. With flash, adjust the ambient/flash balance within the camera's limits when appropriate.
- Check the shadow shape: change the source direction or add fill if the face is too dark. Negative fill blocks reflected light and can deepen a shadow; it does not brighten a face against a bright background.
- Check the location: move or stop if the frame requires an unsafe stand, uncontrollable modifier or unsuitable ground.
If an umbrella, softbox or reflector cannot be held safely in the wind, take it down. For changing clouds, recheck ambient exposure and white balance, then reassess flash balance. For a color cast from foliage or a wall, change the source or position before relying on a large color correction.
A new position can solve a problem that another light would only complicate.
From Capture to Client Gallery Without Losing the Look
The delivery file is a rendering of the shoot and the edit. Keep the camera originals, make a consistent finished export and review that export before sharing it.
Cull fast, export carefully, name everything
Remove missed focus, blinks and accidental lighting failures, then choose a set that covers the intended portraits. Compare neighboring frames for exposure and white-balance consistency without flattening every intentional lighting difference.
A RAW file retains capture data; it is not the same as a finished JPEG or a promise that every viewer will reproduce your edit. Apply the intended white balance, profile and adjustments in the RAW processor, retain the edit settings, and export a rendered copy in the format and dimensions agreed with the recipient. For routine screen delivery, use an appropriate sRGB export and embed its profile where supported; a print lab may require a different specification.
Use stable identifiers such as session-001 and keep the filenames through proof and final exports. Check a few exported files for color, detail and naming. Screen brightness and color handling differ, so a gallery cannot guarantee that every client sees an identical image.
Use a gallery as a proofing tool
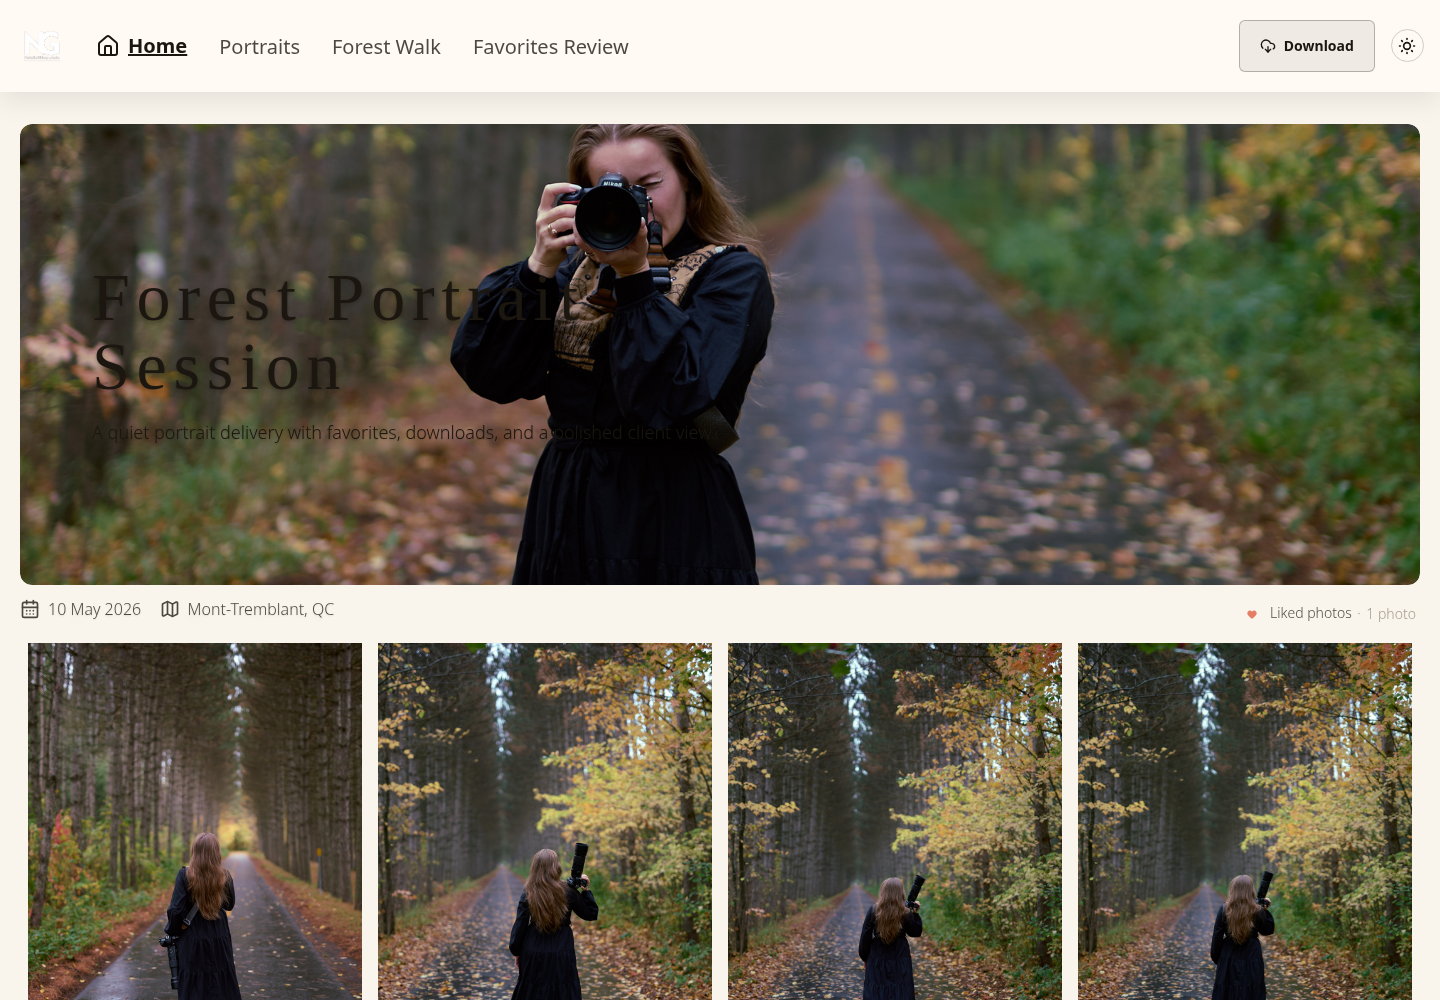
Share the images intended for review, rather than every camera frame. Explain whether the client is choosing favorites for discussion, approving a final list separately or downloading finished exports. Favorites record preferences; they do not automatically constitute an order or approval.
SendPhoto provides gallery organization, favorites, password sharing and download controls. Decide who receives the link and password and which downloads are allowed. Sharing expiry ends link access; it does not delete the files. Access controls do not prevent someone forwarding permitted information or retaining a downloaded copy.
Watermarked previews are generated viewing versions. An allowed unwatermarked Original photo download supplies the uploaded source, so a preview watermark alone does not protect that download. Confirm the intended download choice before sending proofs. Our client photo gallery guide explains the handoff in more detail.
Keep selection discussion tied to filenames, agree the final list explicitly and send the requested final exports. Leave the shoot archive in your own storage workflow rather than treating proofing favorites as a backup or editing system.
A Short Pre-Shoot Checklist You Can Actually Use
Gear
- Camera, suitable lenses, charged batteries and available memory cards.
- A controllable reflector or compact flash/trigger kit, with secure support or an assistant as needed.
- Rain protection and an agreed sheltered or rescheduled alternative.
Decisions
- Where do the subject and camera go, and is the background clean?
- What lights the face, what exposure protects the important detail, and what white balance matches the intended look?
- What changes if sun, wind, rain or foot traffic makes the first setup unusable?
Scout, identify the light, make an ambient test, add only the fill the portrait needs, then recheck focus, highlights and color. Keep a short record of settings and positions so the next session starts from an informed plan.
SendPhoto helps portrait photographers organize and share finished images through galleries with favorites, access and download controls. Deliver the agreed export and review instructions so the handoff supports the work done on location.