
A PSD keeps the editable work: layers, masks and adjustments. A JPEG is a separate delivery image. Converting PSD to JPEG should preserve the master, produce the agreed dimensions and color profile, and leave a file the recipient can open.
The instructions below are based on current Adobe and GIMP documentation checked October 5, 2026. They distinguish Photoshop’s Export As, Save a Copy and Image Processor rather than treating their quality controls as one scale. The credited compression example is Adobe’s; no Photoshop batch or client delivery is claimed as our own test.
For the handoff after export, see the client photo delivery guide. JPEG is useful for many photo deliveries, but layered retouching handoffs, transparency and specific print briefs may require another format.
Table of Contents
- Why JPEGs Are Essential for Client Delivery
- The Standard Method Converting in Photoshop
- Converting Without Photoshop Free and Alternative Tools
- Choosing the Right JPEG Export Settings
- Automating Your Workflow with Batch Conversion
- Troubleshooting Common Conversion Problems
Why JPEGs Are Essential for Client Delivery
A JPEG is widely usable in browsers, phones and galleries. It contains a rendered image, not editable Photoshop layers, and does not preserve transparency. Photoshop’s ordinary JPEG save also reduces a 16-bit image to 8-bit, as described in Adobe’s JPEG format guidance. These structural differences do not mean every export must look visibly worse at its intended viewing size.
JPEG compression discards image data. Keep the layered PSD and create fresh delivery versions from it, rather than repeatedly opening, editing and resaving a JPEG. Exporting cannot recover clipped tones, missed focus or detail absent from the source.
Practical rule: archive the editable master and deliver a separate version. The JPEG does not replace the PSD or its backup.
Agree the format with the recipient. A retoucher may need a layered file; a client selecting finished portraits often needs an ordinary viewing or printing image.
The delivery mindset
Decide three things before export:
- Destination: a viewing gallery, website, social post, print lab or further editing handoff.
- Output brief: required pixel dimensions, crop, color profile and file-size limit, if any.
- Master protection: a separate delivery folder and verified independent backups of the editable PSD.
For an illustrative web brief, a client could request a 2048-pixel long edge, JPEG and embedded sRGB. That is a proposed specification, not a universal SendPhoto requirement or proof of a performed export. A print lab may ask for something different.
The Standard Method Converting in Photoshop
If the PSD was edited in Photoshop, making a delivery copy there avoids depending on another application’s interpretation of Photoshop-specific features. This does not guarantee identical appearance on every screen. Choose the route for the job: Export As for an asset with specified dimensions, Save a Copy for a separate saved JPEG, or Image Processor for multiple files.
Check the controls in your installed version. Adobe’s current documentation and older interfaces can differ; a quality number copied from another dialog may mean something different.
Why photographers export instead of sharing PSDs
The delivery JPEG contains the visible composite. Layers and masks remain in the PSD if you preserve that source; exporting a separate JPEG does not require destructively flattening and overwriting the master.
Check visible layers, linked content and the intended crop first. If the photograph has transparent areas, agree an opaque background for JPEG on a working copy. Use a format that supports transparency when transparency is part of the brief. A smaller JPEG is not evidence that the source lost its layers or that the edit failed.
A repeatable Photoshop export workflow
Save the layered master before preparing a derivative. For the documented Export As route:
- Open the intended document. Confirm the complete visible photograph is the export target, rather than an isolated layer, group or artboard.
- Choose File > Export > Export As. Select JPG.
- Set image dimensions. Keep proportions linked unless the brief requires a separate crop; inspect the preview.
- Choose JPEG quality in this dialog. Compare detail and file size instead of importing a 0–12 value from another route.
- Set the intended color handling. For an sRGB web brief, select conversion to sRGB and profile embedding.
- Export to the delivery folder. Reopen the saved file; check dimensions, appearance, bytes and profile against the brief.
Adobe’s Export As settings currently describe JPG quality as 1%–100%, image dimensions and optional sRGB/profile controls. Canvas size is a separate control: changing it can clip content or add space. Resizing the image and cropping its canvas are different decisions.
Save a separate JPEG copy
For the Save a Copy workflow, prepare any resizing and profile conversion on a duplicate working document, then use File > Save a Copy, select JPEG, give it a separate filename and choose the destination. Embed the intended profile where offered. The JPEG Options dialog uses 0–12 quality, not Export As’s percentage scale. Save a Copy creates another file while keeping the original document open. If JPEG is unavailable through Save As for the document’s features, use the copy route rather than flattening and overwriting the master.
Choose a route and record its settings. “Quality 10” without the application and dialog name is an incomplete export brief.
- Archive PSDs separately: retain editable files and their independent backups.
- Export to a delivery folder: avoid overwriting or mixing sources and derivatives.
- Name versions by purpose: for example
portrait_001_web_2048_v01.jpgandportrait_001_full_v01.jpg.
A full-size file is not automatically print-ready. Agree the print dimensions, crop and lab profile separately.
Converting Without Photoshop Free and Alternative Tools
A free editor can be useful when Photoshop is unavailable, but successful opening does not prove that a PSD’s composite has been preserved. Compare masks, text, blend modes, adjustment effects, linked objects and colors with a trusted reference before using another tool for delivery.
If a key effect is missing or different, obtain a rendered export from the originating application. Do not overwrite the source while troubleshooting.
Free desktop option with GIMP
GIMP is a desktop alternative to investigate, rather than a guaranteed substitute for every Photoshop document. Open a copy of the PSD and review its rendering first. There is no universal requirement to set it to 16-bit before exporting a JPEG.
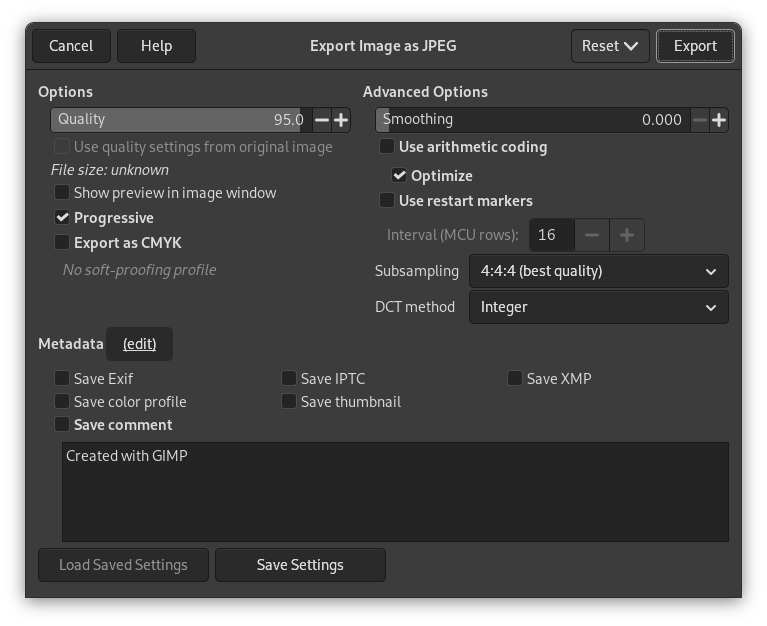
After confirming the intended image and color handling, use File > Export As with a .jpg filename in a separate folder. The GIMP 3.2 JPEG export manual describes a 0–100 quality scale and separate metadata/profile options. Reopen the exported image to inspect the actual result. The same quality number is not equivalent between applications.
See the genuine GIMP manual JPEG dialog. The publisher’s example shows quality 95 and an unchecked Save color profile option. Those example values are not this guide’s recommended delivery settings or proof of our conversion. Decide profile embedding from your brief.
For a raw-file workflow, see converting NEF to JPG; rendering a raw capture is a different task from exporting an already edited PSD.
Online converters and when to avoid them
A web converter may be convenient for an occasional permitted file, but review its current upload limits, processing terms, retention policy and output controls first. Do not upload private portraits, confidential work or unreleased commercial images without authorization for that service.
Check whether the converter preserves the intended composite, dimensions and profile. Test an authorized non-sensitive copy and inspect the saved result; an upload success message does not prove correct rendering. Local processing can avoid sending the file to a third party, though it still needs output checks.
The delivery deadline does not establish permission to send a client’s source file to another service.
Command-line tools for studios and developers
Command-line conversion can fit an established studio pipeline, but PSD support varies by decoder. Do not treat an old package mention or wildcard command as proof that layers, custom channels or Photoshop effects will render correctly.
Before adopting a tool, check its maintained documentation and installed version, then compare representative authorized PSDs against trusted composites. Use an explicit file list, separate output paths and a failure log. Count expected outputs and check each format, dimensions and profile. An exit code alone cannot certify visual fidelity.
The documented Photoshop batch workflow below is a separate option; teams evaluating another decoder should validate it against their own PSD features.
Choosing the Right JPEG Export Settings
Use the destination’s specification rather than one supposedly perfect preset. Record application version, route, dimensions, quality control, profile, metadata choice and filename. A high quality setting cannot compensate for an incorrect composite or insufficient source resolution.
The quality setting that usually makes sense
The scales are different:
| Application and route | Documented quality scale | What to record |
|---|---|---|
| Photoshop Export As | 1%–100% | Percentage and output dimensions |
| Photoshop JPEG Options / Image Processor | 0–12 | Dialog or processor name and value |
| GIMP JPEG export | 0–100 | Value and relevant export options |
These ranges were checked in the linked Adobe and GIMP documentation on October 5, 2026. Do not translate them with a simple percentage formula or assume “10” means the same output. Choose a starting setting in the route you use, compare a lower and higher version at the same dimensions, then inspect the actual saved files.
| Quality choice | Typical tradeoff | Check before delivery |
|---|---|---|
| Lower within the same dialog | Usually fewer bytes, with more visible compression risk | Edges, gradients and fine detail at intended size |
| Middle within the same dialog | A candidate balance, not a universal client preset | Actual bytes and comparison with the master |
| Higher within the same dialog | Usually more bytes; does not restore missing detail | Whether the difference matters for the brief |
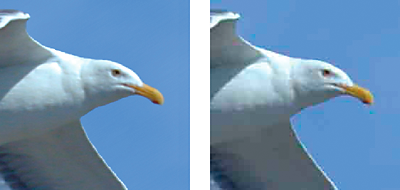
Look at the block shapes around the bird and sky on the right. Compare a crop at 100% and the complete image at its intended viewing size. A screenshot or resized web example cannot establish the quality of a downloadable original.
Color space matters more than most tutorials admit
Check the source profile and the destination brief. Converting to sRGB for an ordinary web brief and embedding that profile are separate choices. Assigning a profile changes the interpretation of existing pixel values; converting transforms colors between profiles. Do not assign sRGB to an Adobe RGB image as a shortcut for conversion.
The Adobe profile guidance explains these operations. Work on a derivative and compare the result in a color-managed viewer. For a print lab, follow its supplied specification rather than assuming sRGB is always required.
A correctly profiled export improves the conditions for consistent viewing. It cannot guarantee identical skin tones on every uncalibrated phone or browser.
Resize and metadata decisions for delivery
Choose actual pixel dimensions for the destination. DPI/PPI metadata alone does not add detail or establish web quality. Keep a full edited version when agreed, and make a smaller derivative for a defined web use. Do not upscale merely to claim a full-resolution or print-ready delivery.
- Final delivery: confirm the requested crop and dimensions, plus print size/profile when relevant.
- Web versions: inspect detail and actual file bytes after resizing; do not assume a smaller file must look better.
- Metadata: preserve agreed copyright/contact fields where supported; review GPS and private information separately. Check the saved file, because routes retain different fields.
Export As’s documented metadata options are limited. Embedding a color profile does not mean all EXIF/IPTC/XMP fields survived. See compressing photos for web for the separate file-weight decision.
Automating Your Workflow with Batch Conversion
Image Processor can create consistent derivatives for a group of PSDs. First review a small representative subset; the same settings do not make differently edited files look identical.
The Adobe Image Processor instructions document a 0–12 JPEG quality scale. It is not the Export As percentage control. Keep the source folder untouched and confirm the intended composite before running a batch.
How to run Image Processor cleanly
For the documented processor route:
- Choose sources. Open File > Scripts > Image Processor and select the source folder or open files; include subfolders only when intended.
- Choose a separate destination. Outputs are organized into a JPEG subfolder.
- Select Save As JPEG. Choose a 0–12 value. For the web brief, select Convert Profile To sRGB and Include ICC Profile.
- Choose sizing. Leave Resize to Fit off for unchanged dimensions, or specify width/height bounds; fitting retains proportions rather than making a fixed square crop.
- Review extras and run. Use an optional loaded action only when its effects have been checked. Inspect representative saved outputs and confirm the full expected set.
Save and load settings when needed, but recheck them for a new brief. Automatic copyright text can overwrite existing metadata; do not replace authorship information casually.
What makes batch export reliable
Consistency starts with an agreed specification and complete sources. Confirm the intended layer visibility and relevant color handling in each source; a batch cannot resolve a missing linked object or decide a client’s crop.
- A dedicated export folder: keep new deliverables apart from masters and previous versions.
- One recorded specification per job: include route, dimensions, quality, profile and metadata; group exceptions separately.
- A naming system: distinguish final, web and proof versions, and reconcile the output filenames/count against the intended source set.
Compare representative hair, fabric, gradients and bright/dark detail, then check files with unusual features individually. Keep a manifest of expected filenames and versions so a missing or stale file is visible before delivery.
Troubleshooting Common Conversion Problems
Diagnose the saved image against the brief and a trusted source rendering. Change one relevant setting, export again from the master and compare the new result. Do not repeatedly resave the damaged JPEG.
Why do colors look dull online
Check the actual embedded profile, whether conversion was performed, and the viewer’s color management. Different display brightness, gamut, calibration, automatic image processing or HDR handling can also change appearance. Compare in a color-managed viewer before assuming one export checkbox fixes every device.
For an sRGB web brief, convert the derivative appropriately and embed its profile. If the source is untagged, establish its intended interpretation before assigning one. Keep the original.
Why won't another app open the PSD
Some tools use an embedded composite while others decode supported layers. A compatibility composite can help a tool that needs one; it is not a universal prerequisite or a guarantee that every Photoshop feature will render correctly.
Check the application/version and actual PSD features. If the rendering differs, obtain an export from the originating application or validate a copy with the needed compatibility settings. Do not turn off or discard layers in the archived master merely to make another viewer open it.
Why does the JPEG look blocky
Inspect compression quality, output dimensions and viewing zoom. A small file enlarged on screen can look blocky even when its quality value was high. Export a fresh version from the master at the requested dimensions, compare quality choices within the same route and check edges, hair, fabric and smooth backgrounds.
Reopening the actual exported file is the final check. A preview or successful save does not establish the correct crop, profile or delivered version.
After exporting the agreed JPEGs, use SendPhoto gallery delivery to organize them into collections. A shared gallery password can be forwarded, and download settings define offered file options. Clients can open the gallery without creating an account; favorites communicate preferences, not final approval. Confirm filenames and versions separately, keep independent backups, and remember that access controls do not stop screenshots or recall saved copies. SendPhoto does not perform the Photoshop export for you.