
Senior photo locations should help a high-school graduating student feel comfortable and show something of their life. A familiar porch, a park path or a school landmark can be a better fit than a dramatic backdrop that requires a long walk or an awkward pose.
These eight location types are options to compare, not a ranking of individual venues. Start with the student's interests, then check access, face-level light, weather and travel time. Choose one main setting and a nearby backup rather than spending the session driving between distant stops. Ask the school for its actual yearbook deadline, crop, background and clothing requirements if these portraits will be submitted there.
Before booking, record the meeting point, who grants permission, any reservation or fee, permitted equipment, changing arrangements, usable paths and a weather decision time. Ask the student what poses and movement feel comfortable. An attractive location is not automatically accessible, quiet or available for a portrait session.
Table of Contents
- 1. Urban Downtown Districts
- 2. Botanical Gardens and Parks
- 3. Lakeside and Waterfront Locations
- 4. Historic Mansions and Heritage Properties
- 5. Academic Campuses and Institutional Grounds
- 6. Forest and Wooded Areas
- 7. Personal Homes and Property Backdrops
- 8. Sporting Venues and Athletic Settings
- Senior Photo Locations: 8-Point Comparison
- Delivering a Polished Final Gallery
1. Urban Downtown Districts
Downtown streets offer brickwork, windows, murals and repeating lines. They can suit a student who likes a city setting or wants casual and formal outfits in the same session. Scout a small area with several backgrounds within a comfortable walking distance; do not assume an alley, loading dock or business entrance is public space.
Look for a permitted sidewalk or plaza where you can photograph without blocking pedestrians, doors or working businesses. Keep the student out of traffic and avoid poses in crosswalks or active loading areas. If a mural is central to the photograph, check the site's photography rules and any permissions needed for the intended use.
Make the city do part of the posing work
Use a wall, window pattern or line of columns to organize the frame. Position the student where the face is well lit, then change your camera position instead of asking for increasingly elaborate poses. Keep the background's brightest sign or strongest line from competing with the face.
- Light: compare open shade with a sunlit spot at the planned session time. Reflections from glass can change quickly; check the face rather than assuming every shaded street gives soft light.
- Movement: try a short walk on a clear, permitted path if the student wants it. A stationary portrait is equally useful.
- Comfort: choose a quieter corner if crowds make the student self-conscious, and agree on a nearby alternative if an event occupies the area.
For outfit and interest-based variations, use our senior picture ideas for guys as a starting point and adapt the ideas to the individual student.
2. Botanical Gardens and Parks
Gardens and parks can provide greenery, paths and a range of backgrounds in one visit. A flowering bed is optional: a simple stretch of trees or a neutral path may work better with a busy outfit. Check the route from parking to the chosen spot, including surfaces, gradients and available seating.
Admission does not necessarily authorize a portrait session. For example, Denver Botanic Gardens' York Street photo policy requires a photography permit for portrait sessions, including senior portraits, even when the photographer is not a professional. Its rules also keep people and equipment on paths. That is a specific venue's policy, not a rule for every park; check your chosen location before booking.
Use the season instead of pretending it does not matter
Scout close to the session date. Flowers, foliage, construction and maintenance can change the available backgrounds. Have a plan that works without a particular bloom, and check opening hours against the light you want: a garden may close before an evening session is possible.
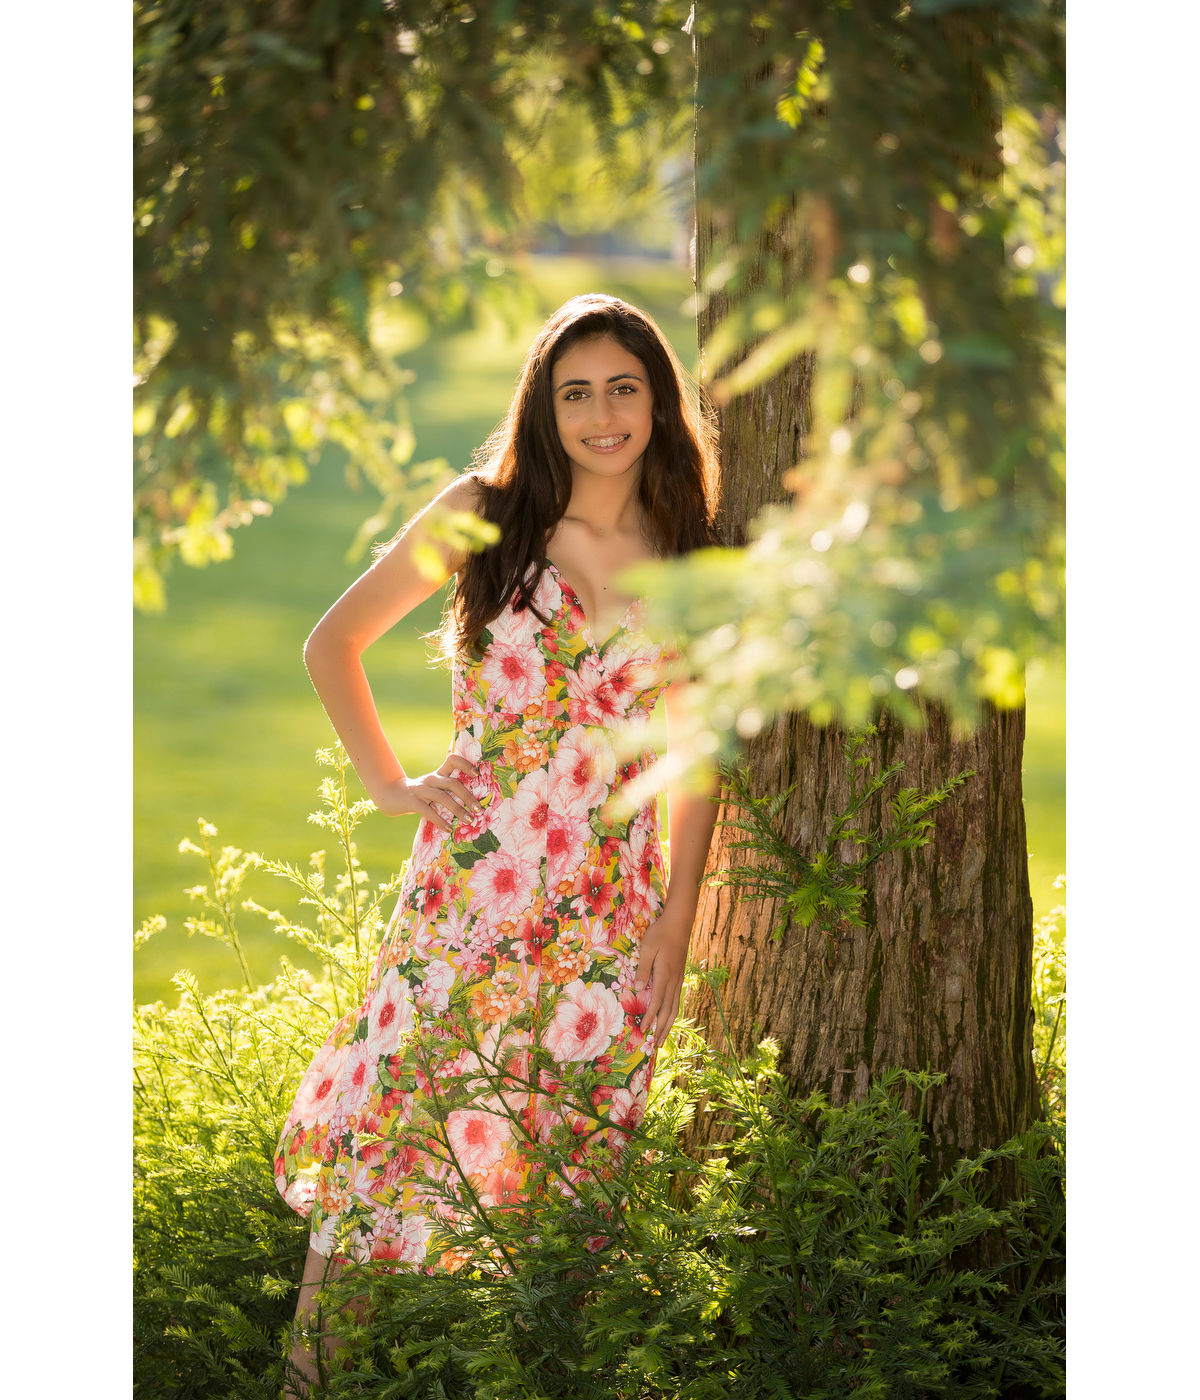
Published portrait reference by Jeff Cable, via Canon's senior portrait article. Cable describes this as a local-park portrait with backlighting and fill flash. It illustrates separating a face from greenery; it is not our client work or evidence of access to a particular garden.
- Background: leave space between the student and foliage where the permitted path allows it. Check for branches or bright gaps appearing directly behind the head.
- Light: take a test frame to check face exposure and patchy sunlight. Use fill light only where equipment is permitted and without obstructing other visitors.
- Weather: choose an agreed sheltered alternative or reschedule if the conditions make the route or session unsuitable.
Our outdoor portrait lighting guide explains how to assess face light before choosing a background.
3. Lakeside and Waterfront Locations
A waterfront can provide an open horizon, reflections and a simple background. Choose a stable, authorized shore path or viewing area with enough room to work away from the edge. Access to a lake does not imply permission to use a private dock, boat or adjoining property.
Visit at the intended time to assess wind, glare and how people use the space. An evening glow is only one possible look; do not make the plan depend on a particular sunset. A nearby sheltered path can be a better backup than moving closer to the water to chase a reflection.
Watch wind, spray, and footing before worrying about poses
Confirm safe footing before setting up. Avoid wet rocks, unstable logs, dock posts and poses close to an unprotected edge. Do not ask a student to enter the water for a photograph. Keep bags and equipment where they cannot obstruct the route or create a trip hazard.
- Wind: ask whether wind-blown hair suits the student's preference. If it does not, change the angle or use the sheltered backup.
- Spray and glare: keep equipment away from spray and check whether bright water distracts from the face. A tighter composition can reduce glare in the frame.
- Weather decision: agree when to call off or move the session. Golden hour does not make hazardous weather or slippery surfaces safe.
A dry bench in an allowed area can offer a seated variation if the student is comfortable with it. Keep both standing and seated options within the same safe working area.
4. Historic Mansions and Heritage Properties
A heritage property can provide doors, columns, stonework and formal gardens. It may suit a student who wants an architectural background, but booking and preservation rules can make it a more involved choice than a local path or home setting.
Ask which areas the booking covers, whether portraits are allowed indoors, and what restrictions apply to flash, tripods and props. Do not assume a tour ticket grants portrait access or that an interior will be available if it rains. Confirm changing facilities and a usable route rather than treating a grand staircase as the only portrait spot.
Build the session around architecture, not decoration
Pick one or two permitted backgrounds. Use a doorway or repeating columns to frame the student without allowing the building to dominate every image. Check face light at that exact spot; an impressive room may still be too dark for your planned approach.
- Keep public entrances, paths and emergency access clear.
- Ask before touching, leaning on or moving historic furniture and objects. Do not use fragile features as posing supports.
- Choose clothes that feel right to the student; a formal venue does not require an outfit they dislike.
- Confirm a separate weather backup if the booking covers only outdoor areas.
One wider portrait can show the architecture, followed by a closer frame with a quieter background. You do not need to cover every room or garden to make the location meaningful.
5. Academic Campuses and Institutional Grounds
A high-school entrance, courtyard, library exterior or other familiar landmark can connect the portraits to graduation. Use a location with a real connection to the student rather than implying attendance at an institution merely because its architecture is attractive.
Check with the relevant school or property manager. Enrollment, a team membership or an open gate does not automatically authorize a portrait session. Ask about available areas, visitor access, events, closing times and restrictions on equipment. The best time depends on that site's calendar; breaks between classes are not reliably quiet.
Use campus landmarks with restraint
Choose one recognizable view and a simpler nearby background. Keep signage or a building visible when it adds context, then make some closer portraits where the student's expression carries the image.
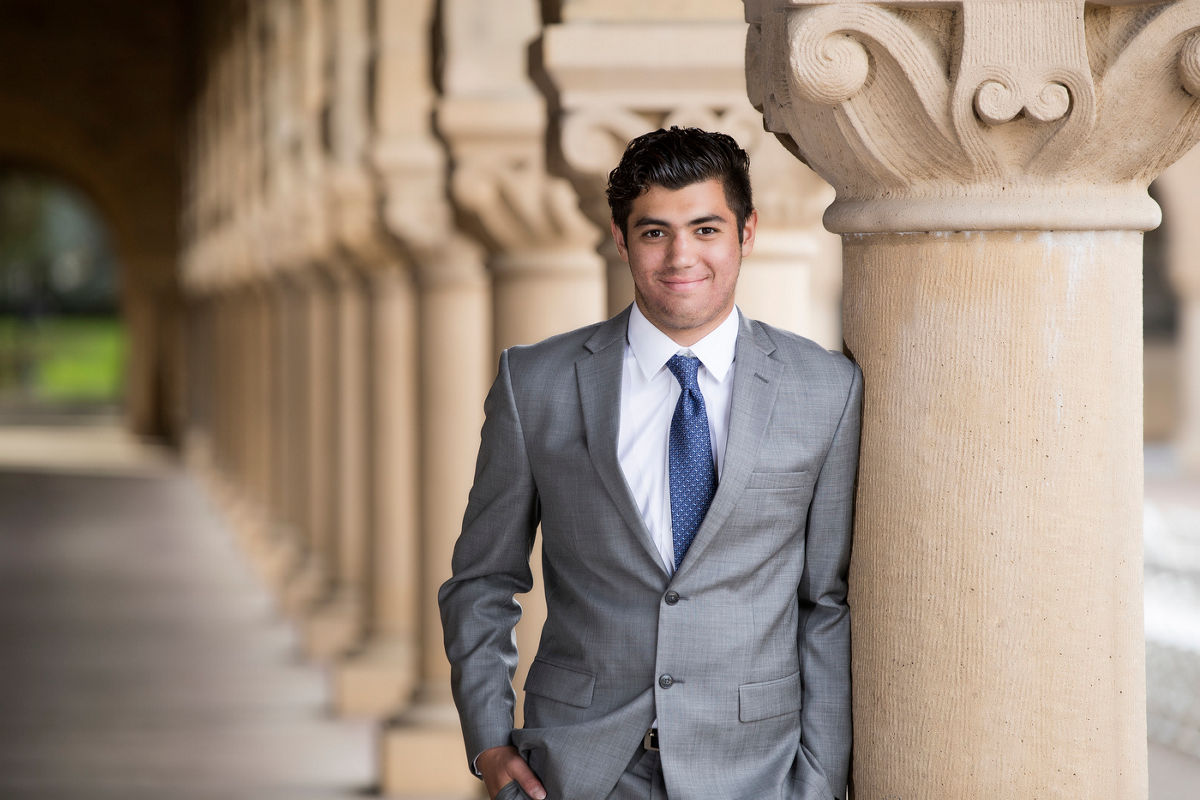
Published portrait by Jeff Cable, via Canon. His accompanying account identifies a high-school baseball player and describes formal portraits at Stanford University. The columns demonstrate framing; this reference does not establish that the student attended Stanford or that the location is currently available for sessions.
- Meaning: ask which part of the student's actual school experience they want represented.
- Route: keep the chosen landmarks close enough to avoid spending the session crossing campus. Check the usable path and an alternative to stairs.
- School submission: obtain the school's current yearbook instructions separately. A campus background or graduation outfit may not meet its required portrait format.
If the school will not permit the shoot, use another authorized location and bring a permitted personal item, such as a graduation gown or an instrument, to convey the milestone.
6. Forest and Wooded Areas
Wooded areas offer trunks, paths and foliage that can simplify the frame. They can suit a student who enjoys nature, but a forest does not guarantee privacy, soft light or an easy route. Scout an established, permitted path and choose a working area with stable ground.
Check the relevant land manager's rules. National Park Service photography guidance, for example, describes conditional permit rules and explains that other activity requirements and entrance fees can still apply. Its guidance concerns NPS sites, not every woodland or local park; contact the specific site if the requirements are unclear.
Let the light stay soft
Look at the student's face for patches of sun and shade. Move within the allowed area to find more even light, or change the composition. A dense canopy can be quite dim, including near sunset, so check the exposure and usable shutter speed before committing to the spot.
- Stay on authorized routes; do not climb trees or move into protected vegetation for a cleaner background.
- Allow time for the actual walking pace and route. Ask about footwear, comfort and access needs before choosing the spot.
- Bring practical supplies appropriate to the local weather and insects, and agree on a turnaround or rescheduling plan.
- Use trunks as background lines rather than assuming a fallen log is a safe seat or posing support.
A short section of accessible trail may provide enough variety. The goal is a comfortable portrait session, not reaching the most remote part of the woods.
7. Personal Homes and Property Backdrops
A porch, backyard, room or family property can make the photographs feel personal and reduce travel. It can also be busy, poorly lit or difficult to access. Ask the student whether they actually want their home represented and obtain the property owner's permission before arranging the shoot.
Do not assume a private home means no restrictions or guaranteed accessibility. Check the entrance, steps, path width, available space and local requirements relevant to the planned session. Agree on where equipment and changing clothes can go, and who may be present.
Keep the setting natural, not over-styled
Choose a familiar part of the home with a manageable background. A guitar, book or pet can add meaning if the student wants it; there is no need to invent an elaborate theme. Ask before moving furniture or personal items, and avoid using an unverified rail, swing or other fixture as support.
- Light: assess a window, porch or shaded area at the session time. Remove distracting clutter only with the owner's agreement.
- Comfort: allow a seated or standing option that works for the student without forcing a pose or expression.
- Privacy: check the frame for house numbers, documents, screens and other identifying details. Agree which photographs may be delivered and which, if any, may be published.
For delivery choices and metadata checks, see our secure online photo sharing guide. A private gallery setting does not remove identifying details already visible in a photograph.
8. Sporting Venues and Athletic Settings
A permitted court, track or field can reflect an athlete's interests. Uniforms, a ball or other familiar equipment may supply enough context without requiring an action sequence. Ask what the student wants remembered about the sport rather than assuming every athlete wants a dramatic competition pose.
Obtain permission from the facility manager and confirm the specific area and time. Team membership is not permission to enter a locked facility or work during active play. Keep the session clear of matches, training and routes used by other athletes; choose a different location if you cannot work safely without interruption.
Mix posed frames with real movement
Start with a stationary portrait in a permitted area. If the student wants movement, agree on a brief, familiar action they can comfortably repeat with clear space around them. Do not introduce a difficult maneuver, ask them to balance on unsuitable surfaces or stage a shot in the path of active play.
- Background: court or field markings can establish the sport without showing the whole venue. Check distracting signs and equipment.
- Light and equipment: check the actual conditions; use flash only where the facility allows it. Specialized lighting is not essential to every athletic portrait.
- Variety: make a closer portrait and a wider environmental frame before adding movement. Keep the student involved in choosing the approach.
Our sports photography guide covers motion and exposure planning. Apply only the parts that fit a controlled portrait session and the venue's rules.
Senior Photo Locations: 8-Point Comparison
Use this table to shortlist a location, then verify the actual site. Costs, permissions, access and light vary within every category; the portrait directions below are possibilities rather than promised results.
| Location | Access planning | What to arrange | Possible portrait direction | Fits a student who wants | Useful quality |
|---|---|---|---|---|---|
| Urban district | Check public space, businesses and events | Quiet permitted spot; light and crowd backup | Architectural or city setting | A city connection or outfit variety | Several backgrounds within a small area |
| Garden or park | Check portrait permits and opening hours | Reservation if required; usable paths; seasonal backup | Greenery or a simple natural background | Plants, paths or an outdoor setting | Background variety in one visit |
| Waterfront | Confirm shore or dock access and safe footing | Wind and weather plan; stable working area | Open horizon or water in the background | A water setting without entering it | Simple backgrounds where conditions allow |
| Heritage property | Confirm booked areas and preservation rules | Equipment permission; indoor access if needed | Formal architecture or historic details | An architectural backdrop | Repeating doors, columns or stonework |
| School or campus | Ask the manager about sessions and events | Visitor access; nearby landmarks; yearbook requirements | School context or a quieter campus portrait | A graduation connection | Recognizable personal context |
| Woodland | Check land-manager rules and authorized routes | Usable trail; face-light check; weather backup | Trees, paths or a restrained natural frame | A nature setting and manageable walk | Background lines and foliage |
| Home or family property | Ask the owner; assess the actual route and space | Light; changing space; privacy review | Familiar surroundings and personal items | A home connection or less travel | Personal context without distant stops |
| Sporting venue | Ask the facility manager; avoid active play | Authorized time and area; permitted equipment | Athletic identity, stationary or controlled movement | Their sport represented | Familiar equipment and venue markings |
Once you have a shortlist, compare the total session plan: travel, preparation, walking, outfit changes and usable shooting time. A nearby permitted backup is more helpful than an impressive second location that cannot be reached within the booking.
Delivering a Polished Final Gallery
Select and edit the photographs consistently, then prepare the agreed delivery files. Keep your own master files and backups independently of the delivery gallery. Check the school's specific submission format separately from the files intended for family viewing or printing.
Agree the recipient, selection deadline and permitted uses with the student and family as appropriate. Obtain any permissions required for a minor and record publishing permission separately from permission to photograph or deliver. Do not assume a family receiving the gallery authorizes a public portfolio post.
SendPhoto client galleries can give recipients a place to view the finished set. Use collections to organize photographs by outfit or location, while remembering that collections are not separate access controls. Favorites record preferences; define your selection process rather than treating a favorite as final approval or an order.
Choose the relevant password protection and download controls for the delivery. A password and link can be forwarded, and download restrictions cannot prevent every saved copy or screenshot. Include a short handoff note explaining the files provided, how to return selections, and the agreed rights for personal use or publication.
The location gives the portraits context. A clear selection and delivery process helps the student and family use the finished photographs.